

Deepfake Detection Python: Build a Working Pipeline

Someone hands you a 40-second clip and asks whether it's real. You've already run the demo notebook, loaded a checkpoint, scored a sample from a public benchmark, and watched 0.97 appear on screen. Then the actual clip arrives: shot on a phone, sent through a messaging app, downloaded again, re-encoded twice. Your model returns 0.52 and nothing else, and you have no idea whether that number means anything.
A usable deepfake detection Python pipeline is built around that second moment, not the first. The work isn't a bigger model. It's a chain of stages that each produce evidence you can inspect: timestamps, face-crop rates, clip scores, a video-level number, and an evaluation report that tells you how the score behaves on footage like the footage you receive.
Benchmark accuracy is the weakest part of that chain, not the strongest. Build accordingly.
Pipeline Stages and Libraries at a Glance
A newsroom gets a 40-second clip from a viewer, and the editor needs a decision by 6pm. A bare yes or no won't survive the phone call from the subject's lawyer. What the editor needs is a per-video score, the frames it came from, a confidence figure, and a plain note on what the system could and couldn't see.
That request sets the architecture. A deepfake detection Python pipeline is six stages in a fixed order, and each one hands the next a file it can open and check.
| Stage | Typical Python tools | Output | Common failure |
|---|---|---|---|
| Decode video | OpenCV or ffmpeg-python | Timestamped frames | Variable frame rate shifts timestamps |
| Detect and align faces | RetinaFace or MTCNN | Aligned face crops | Profile or occluded faces missed |
| Build clips | NumPy | Fixed-length frame windows of 32 to 96 frames | Gaps from failed detections break temporal order |
| Score clips | PyTorch or timm | Clip-level fake probabilities | Correlated frames make confidence look higher than it is |
| Aggregate to video | NumPy | One video-level score | A simple mean hides a short fake segment |
| Evaluate | scikit-learn | ROC-AUC, PR-AUC, F1, false-positive rate | Random frame splits leak near-duplicates into test data |
The libraries matter less than the handoffs. OpenCV and ffmpeg-python decode, RetinaFace or MTCNN locate faces, NumPy builds clips and aggregates scores, PyTorch or timm supplies the backbone, scikit-learn computes the metrics. Swap any one of them and the pipeline still works, provided every stage writes something a later stage can verify.
Most beginners build the model first. They select a backbone, train it on FaceForensics++ crops, and only later discover that the decoder dropped timestamps on variable-frame-rate footage, or that face detection failed on a fifth of the frames. By then the model looks weak, and the fault sits upstream. Debugging a model that was fed broken clips burns weeks you can't recover.
Run a single clip through all six stages before you scale to a dataset. Open each intermediate file by hand: the frame list with timestamps, a grid of the crops, the shape of the clip array, the vector of clip scores. A broken early stage looks exactly like a weak late model, and only manual inspection separates them.
Practical rule: if you can't point at the file a stage produced, that stage isn't finished.
If you're staffing this work, the profile that matters is pipeline discipline rather than architecture trivia, and vision engineering talent from TekRecruiter is a useful read on what that role covers.
How to Preprocess Video and Faces Step by Step
Preprocessing decides more of your final score than the backbone does. A detector trained on landmark-aligned, uniformly cropped faces will fail on crops that were resized before alignment, because the geometry it learned no longer holds. At dataset level the effect is just as blunt: a multi-scenario deepfake benchmark reported AUC of 75.49% when training only on FaceForensics++, 53.12% when training only on Celeb-DF, and 67.19% for a direct merged setup. Comparable modeling, very different outcomes, driven by what the data looked like.
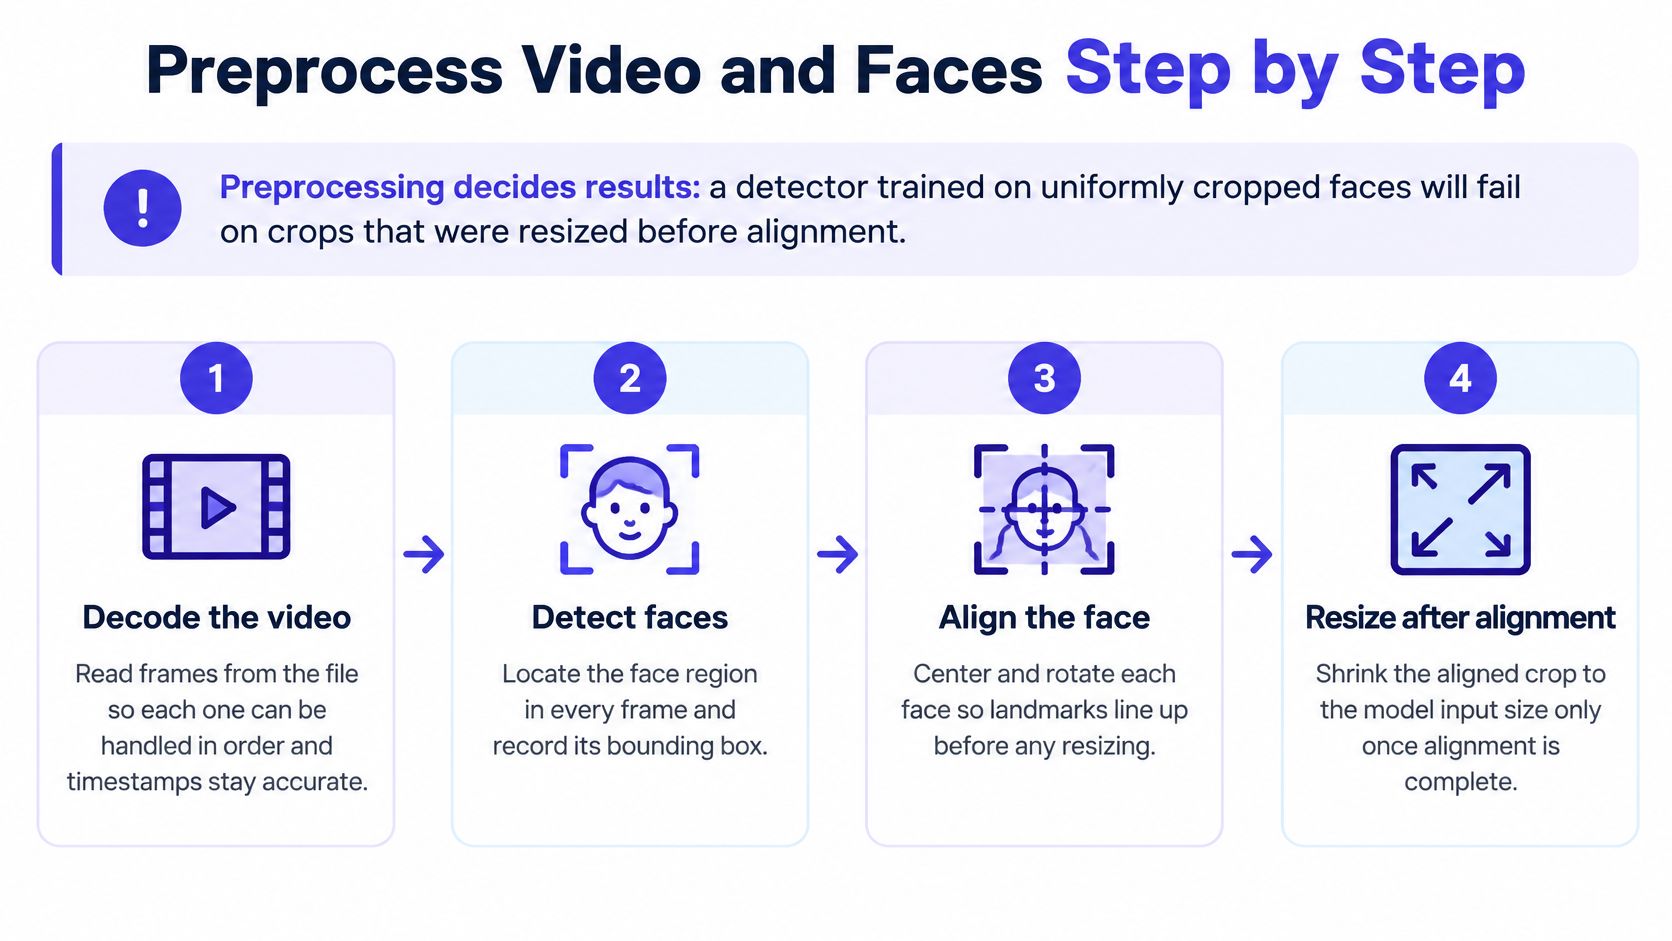
That variance makes the order of operations essential. Fix preprocessing before you compare two models, and preserve the details the model never sees but you will need: timestamps, codec, resolution and drop rates.
Decode the file and keep original timestamps. Convert variable-frame-rate phone footage to a constant frame rate before anything else. A 30 fps assumption on VFR footage stretches time, so a "one-second window" is sometimes 0.7 seconds. The usual slip is treating
cv2.VideoCapture's frame index as if it were elapsed time.Sample a fixed number of frames per clip. Thirty-two evenly spaced frames is a reasonable start. Every clip needs the same temporal length so the scores stay comparable across videos. Sampling every Nth frame does the opposite, because clip duration then depends on the source frame rate.
Detect faces and stick to one identity. RetinaFace or MTCNN, keep the largest face, and track it frame to frame with an IoU match or a lightweight tracker. Mixing two speakers into one clip teaches the model to compare faces instead of forensic artifacts. Taking the highest-confidence box per frame independently is the classic mistake: it flips between people mid-clip.
Align before you resize, never after. Use five landmarks (both eyes, nose tip, both mouth corners), rotate and crop so those points land in fixed positions, then resize to 224 by 224 and normalize with the exact mean and standard deviation used in training. Resizing first bakes a pose into the crop that the model has never seen.
Drop or mask failed frames and log the rate. A zero-filled crop reads to a convolutional backbone as a face-shaped artifact and produces confident nonsense. Copying the previous frame is worse, because it duplicates a moment in time and makes the sequence look more temporally consistent than it is.
Save the clip as an array plus a metadata record. Source ID, codec, resolution, frame timestamps, bounding boxes, drop rate. That record answers every later question, such as whether a video failed because of compression or because no face was ever found.
Then enforce a threshold. Once detection fails across a large share of a video's frames, the video-level score is guesswork, so route it to human review instead of reporting it.
A pipeline that admits it couldn't see the face is worth more than one that guesses about a face it never found.
Choosing a Model and Clip Length
The decision most tutorials skip is how much time the model is allowed to see. A frame-level CNN treats each crop independently: fast to train, easy to debug, and blind to motion. Face swaps often expose themselves in movement, through jawline flicker, a boundary that pulses between frames, or lips that drift out of sync, and a per-frame classifier observes none of it.
Start with the frame CNN anyway. It gives you a working baseline, a confusion matrix, and a clear picture of which errors are spatial and which are temporal. Add a temporal model when the errors cluster in moving footage, not before.
| Model and setup | Accuracy | AUC | F1 |
|---|---|---|---|
| TimeSformer, 32 frames, no fine-tuning | 68.1% | 0.679 | 66.4% |
| TimeSformer, 96 frames, no fine-tuning | 71.2% | 0.722 | 69.6% |
| TimeSformer, 96 frames, 30% fine-tuning | 78.4% | 0.801 | 77.0% |
Read those rows as a comparison of settings, not a ranking of models. Longer clips helped inside one study: moving from 32 to 96 frames raised accuracy from 68.1% to 71.2% with no target-domain fine-tuning, while 30% fine-tuning reached 78.4% accuracy and 0.801 AUC (published TimeSformer detection results). The fine-tuning gain is larger than the clip-length gain, which is the lesson worth carrying.
Don't compare those numbers with figures from other papers. A 2024 study reported 87.5% accuracy for XCeption, 83.7% for VGG and 68.7% for ResNet on its own deepfake video set (IBIMA Publishing evaluation), and those figures describe a different test set, split and manipulation mix. Ranking across studies tells you nothing. Comparing settings inside one study tells you plenty.
Pick the clip length your hardware can afford, then hold it fixed for every architecture you compare.
Hold preprocessing fixed too, down to the normalization constants, or the comparison measures your preprocessing rather than your model. Train on paired real and fake clips drawn from the same source video, which cuts down shortcut learning on background, lighting and compression fingerprints. Add augmentations that imitate deployment: H.264 recompression, resizing, blur, frame dropping and colour shifts.
Weighing a 2D backbone against a 3D CNN or a video transformer is ordinary model selection, and picking ML models for small businesses frames the same trade-offs in terms of data volume, latency and maintenance budget. Before downloading training data, it's worth reading about the benchmark datasets used in deepfake research, because which one you pick shapes what your detector can and can't do.
Metrics and Mistakes That Inflate Detector Scores
A high benchmark score proves the detector works on that benchmark, and little else. It works like a driving test held in an empty car park: the exam confirms the car responds to the controls, while real traffic stays untested. In one real-world evaluation, a detector scored 91.07% on privately collected web data, and video quality alone widened the spread: 99.26% on raw deepfakes, 95.73% in high quality and 81.00% in low quality (WildDeepfake evaluation).
The pattern repeats whenever compression enters the picture. The FaceForensics++ paper reported the same slide back in 2019: the harder the video was compressed, the further detection accuracy fell. That is the compression a messaging app applies without asking anyone.
The collapse gets steepest in the field. A study of in-the-wild footage found state-of-the-art detectors exceeding 0.92 AUROC on balanced academic test sets yet performing as poorly as 0.53 on real-world data, which is close to a coin flip (in-the-wild detection study). None of these numbers mean the models are bad. They mean the test set was easier than the deployment, and each gap is the same failure in a different costume: the model learned the benchmark, not the task.
Six tests to run before you trust a score
Split by source video, never by random frame. Near-duplicate consecutive frames leak across a random split and inflate your test score, sometimes by double digits. Group every frame by its parent video and split at that level, so the test set only ever sees footage the model never trained on.
Hold out an unseen dataset and recompress the test set. Run your test clips through the same pipeline your real inputs travel: platform transcode, resize, screen capture. Unseen data plus realistic degradation is the only test that resembles production.
Log the face-detection rate for every video. A detector that fails to detect profile or occluded faces produces clean-looking clips containing no face at all, and the aggregate score never shows it. If the face extractor found nothing, the verdict describes nothing.
Treat missing metadata as a weak signal only. Platforms strip metadata on upload, so absence proves nothing and presence proves little more. Weight it low and say so in your report.
Score clips independently, then aggregate with a trimmed mean or top-k mean. A plain average over correlated frames hides a short fake segment inside a long real video, and averaging many near-identical frames makes confidence look artificially high.
Test face swaps and fully synthetic or diffusion-generated video as separate problems. Frame-level artifacts differ between them, so one detector can ace one and miss the other entirely.
Here's the video walkthrough of the same evaluation discipline in practice.
Report more than accuracy
Accuracy collapses several different failures into one number, and class imbalance hides the ones that hurt most. A detector that labels every clip real still scores well on a mostly-real test set while catching nothing at all.
| Metric | What it shows | Report it when |
|---|---|---|
| ROC-AUC | How well scores rank fakes above real videos across all thresholds | Always, as the baseline comparison |
| PR-AUC | Performance when fake videos are rare in the data | The real-world mix is heavily real |
| Equal error rate | The threshold where false positives equal false negatives | Comparing two detectors on the same test set |
| Fake recall | The share of fakes the detector catches | Fraud and newsroom triage |
| False-positive rate | The share of real videos wrongly flagged | Legal evidence and public accusations |
| Calibration error | How closely predicted probabilities match observed fake rates | Any score shown to a user |
Report false positives and false negatives separately, always. A missed fake and a wrongly accused real video carry completely different costs, and a single F1 score averages that difference away. The precision and recall trade-off is where you decide how much of each your workflow can absorb.
Calibration deserves its own sentence because it decides what the score means. A 0.7 output on a badly calibrated detector is not a 70% chance of fake; it is only a rank order. Then add an abstain band around your threshold: scores inside that band go to a human, not to a verdict, because an uncertain result presented as a decision is how bad calls reach publication.
Decide Whether to Build In-House or Use a Detector
A stronger visual model is not always the right next step. Benchmark analysis notes that trustworthiness and deployment readiness remain systematically undermeasured, and that existing benchmarks contain no watermarked content, which leaves the interaction between provenance signals and detection largely untested (review of deepfake benchmarks). The same gap shows up in live settings: offline face-swap datasets often fail to reflect video-call conditions such as webcam capture, lighting variation and transmission artifacts, so a detector that scores well in the lab can still miss the impersonation attempts that matter in production.
That reframes the build-or-buy question. The decision is less about whose image model wins on a leaderboard and more about who can combine audio forensics, temporal checks, metadata inspection and provenance verification into usable evidence, then stay calibrated when your footage shifts. Live impersonation cases usually involve exactly that combination of signals.
- Build in-house when you must retrain on your own sources, keep footage on your own infrastructure, or produce audit trails your legal team signs off on.
- Use a ready detector when volume is high and you need fast triage plus a second opinion alongside your own model; this guide to deepfake detection software covers what to compare across tools.
A ready tool deserves the same scrutiny you would give your own code. AI Video Detector reports a confidence score rather than a verdict, because a detection score is a probability and no detection is perfect. Basic detection runs without registration, so you can pass a handful of labelled clips through it before deciding anything, and the output integrates with existing editorial workflows instead of living in a separate tab nobody opens.
Whichever route you take, keep a human reviewer in the loop for anything above low stakes, and log every decision with its score, threshold and reviewer.
Decide this way: label 50 clips from your own sources, run them through your pipeline and any tool you are evaluating, and compare false-positive rates before you commit.
That 50-clip test is the fastest way to see whether a score means anything on your footage. Start it now with AI Video Detector by uploading a clip and reading the confidence score next to the frame-level and audio evidence behind it. Bring your own labelled clips, include a few recompressed copies that mimic what messaging apps do to video, compare what the detector says with what you know to be true, and let the false-positive rate make the decision.
