

Level Frames Review for AI Video Forensics: A 2026 Guide

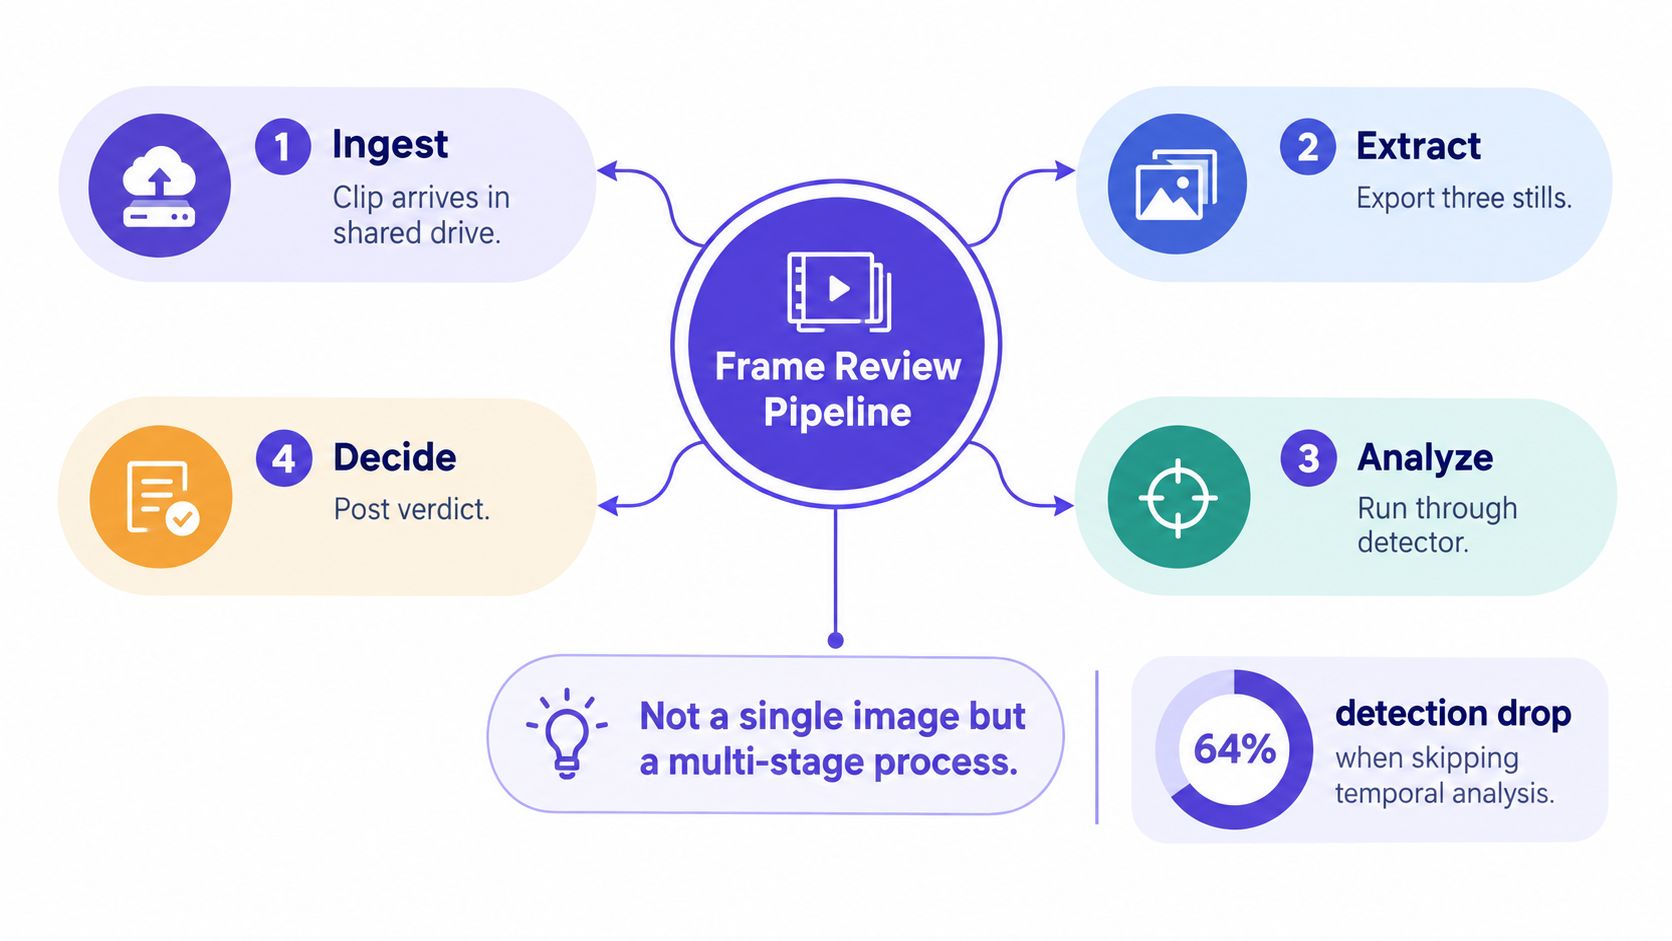
A clip lands in a newsroom shared drive. Someone exports three still images, runs them through a public detector, and posts a confident verdict in the team chat. The workflow feels fast, but it strips away the evidence that often determines whether footage is authentic, manipulated, or just damaged by compression.
A reliable Level Frames review treats video forensics as a chain of measurements, not a single-image contest. Spatial artifacts matter, but so do motion continuity, audio alignment, encoding history, sampling design, and the model's performance on footage unlike its training data. The practical question isn't whether one frame looks suspicious. It's whether independent signals remain suspicious after controlled testing.
Why Frame Review Is a Pipeline, Not a Single Image
A still-image classifier sees one arrangement of pixels. It can identify an unusual texture, an implausible edge, or a face that sits outside its learned distribution. It can't see whether the face jumps between frames, whether the mouth follows the speech, or whether a codec has created the same artifact across an entirely genuine clip.
That limitation creates the dominant failure mode in AI video forensics. An analyst selects a few visually interesting frames, receives probability scores, and treats those scores as a video-level conclusion. Yet a manipulated clip may combine a genuine background with a face swap, contain only a short altered interval, or have been resized and recompressed until both real and synthetic artifacts are difficult to separate.
Practical rule: A suspicious frame is an investigation trigger, not a verdict.
A defensible workflow has three analytical layers:
- Spatial analysis: Score sampled frames for blending seams, texture irregularities, geometry problems, and frequency-domain anomalies.
- Temporal analysis: Compare adjacent frames for optical-flow discontinuities, landmark drift, flicker, and broken motion coherence.
- Codec-aware calibration: Test the detector against the same kinds of compression, resizing, lighting, and occlusion found in the submitted file.
The layers have different failure profiles. A spatial model may flag a genuine face after aggressive compression. A temporal model may misread a fast camera pan. Metadata may reveal an export path without proving manipulation. Aggregating calibrated evidence helps reduce the risk of mistaking one fragile signal for a forensic finding.
The published literature illustrates why this discipline matters. One detector reported 99.41% accuracy on raw FaceForensics++ and 99.31% on Celeb-DF v2, but 81.35% on WildDeepfake in the cited evaluation, a substantial cross-dataset decline documented in the review of deepfake detection generalization. The numbers don't establish how that model will perform on your clip. They establish the operational warning: benchmark confidence doesn't transfer automatically to uncontrolled footage.
Decoding the Video and Designing a Smart Sample
Before a detector touches a frame, preserve the source and document its technical identity. Hash the original file, retain it unchanged, and record the container, codec, color space, bitrate, frame rate, duration, timestamps, and keyframe structure with tools such as MediaInfo or ffprobe. If supplied metadata says one thing and the decoded stream says another, preserve both observations instead of normalizing the discrepancy without disclosure.
The first export should avoid adding damage. Use lossless PNG stills for image inspection or a lossless, forensic-friendly intermediate such as FFV1 when your workflow supports it. JPEG exports and repeated video re-encodes can erase or manufacture high-frequency patterns, so a later reviewer needs access to the untouched master as well as any derivatives.
Sampling should be uniform enough to represent the whole clip, then denser where the evidentiary risk is higher. Add samples around scene cuts, visible faces, rapid movement, expression changes, camera transitions, and intervals already flagged by another signal. The exact plan depends on duration and computational budget, but three convenient stills are rarely a representative sample.
| Content event | Sampling density | Rationale |
|---|---|---|
| Stable speech or low motion | Uniform baseline sampling | Establishes ordinary texture and motion behavior |
| Scene cut or camera transition | Dense local sampling | Separates edit boundaries from manipulation boundaries |
| Face enters or leaves frame | Dense around the transition | Tests detector stability and face-track continuity |
| Rapid head or body movement | Dense across the movement | Reveals motion discontinuities and landmark drift |
| Suspected manipulation interval | Dense before, during, and after | Tests whether the anomaly persists across neighboring frames |
A practical video codec analysis workflow helps analysts connect detector behavior to the file's encoding history. That connection matters because a model trained on clean frames may respond to a recompressed derivative for reasons unrelated to synthesis.
Spatial Artifact Signals Worth Trusting
Spatial inspection is useful when analysts ask what a signal represents and how it behaves after ordinary media processing. Heatmaps look persuasive, but a bright region only says that a model found a learned irregularity. It doesn't prove that a person, face, or scene was generated.
Blending boundaries are often the most useful signal in face-swap cases. Look for chromatic or luminance discontinuities around the swapped region, especially where the face meets hair, ears, jawline, or background. These edges can survive when broader facial texture appears convincing, but the analysis needs a tight and correctly aligned region of interest. Loose crops invite background, hair, and lighting artifacts into the score.
Eye and mouth geometry works better as corroboration. Inspect pupil shape, catchlight placement, eyelid motion, teeth rendering, and the relationship between lips and surrounding skin. A single odd highlight can result from glare, motion blur, or a low-quality camera. Repeated geometric inconsistencies across neighboring frames carry more weight.
GAN-style frequency fingerprints can reveal periodic structure associated with some generator families. They're weaker as a general detector because the pattern depends on the generation method, preprocessing, and subsequent compression. Diffusion outputs can show softer noise-residual behavior in mid-frequency bands, but resizing and recompression can alter those distributions as well.
The cross-dataset evidence argues for restraint. The cited research reports a 77% F1 score for the best detector on the in-the-wild DF-W benchmark, despite much stronger results on controlled datasets, as documented in the DeepfakeBench research paper. That gap is why I weight persistent blending boundaries and repeated pupil or mouth anomalies above isolated FFT peaks.
For practitioners, the spatial pass should produce a map of where and when to inspect, not a binary declaration. A useful report records the crop, frame timestamp, artifact type, model score, image quality, and whether the same feature appears after a controlled derivative is created.
A fingerprint features guide can help organize frequency and texture observations, but no fingerprint should be interpreted independently of temporal behavior and codec conditions.
Temporal Consistency Catches What Frames Miss
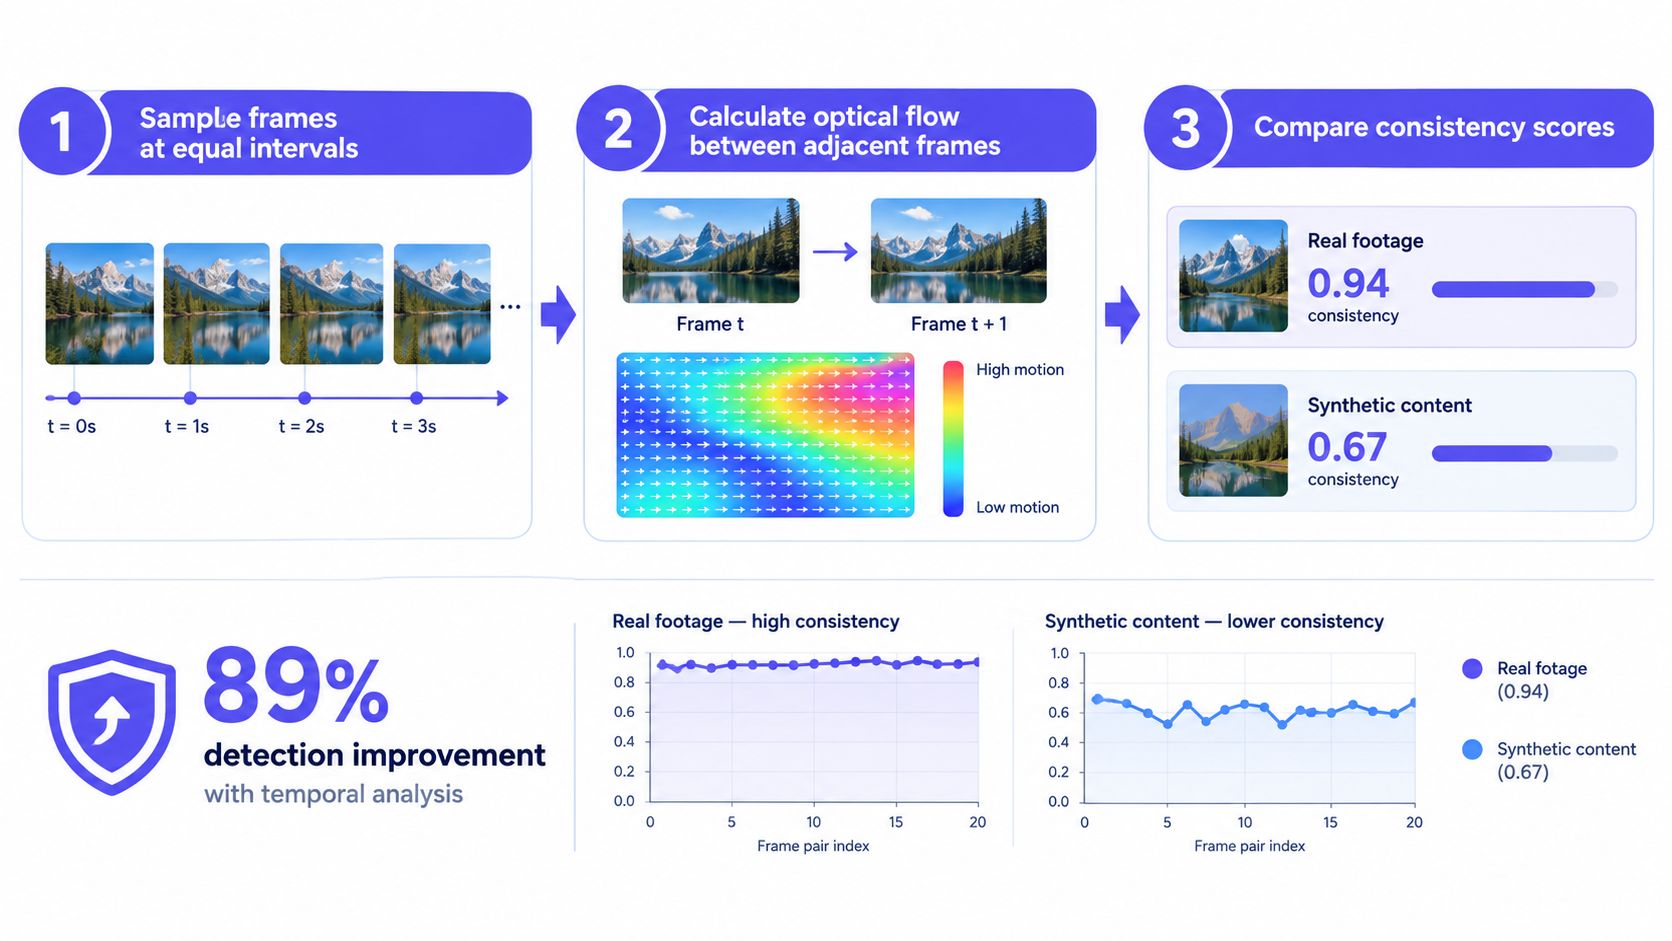
Temporal analysis asks whether the pixels behave like a coherent recording. Start by tracking faces and relevant landmarks across adjacent frames. Compare optical-flow vectors around the eyes, mouth, jaw, hairline, and background, then look for motion that abruptly contradicts nearby regions.
Synthetic content may expose itself through jitter, drift, or re-anchoring. A landmark can remain plausible in one still and then shift unnaturally when the head turns. A mouth may retain a convincing shape while its motion disagrees with the surrounding cheeks. These defects are easy to miss when an analyst inspects frames independently.
Flicker is another valuable check. Measure frame-to-frame luminance and chrominance variation in stable regions, then compare those changes with camera movement and illumination. Repeated brightness or color oscillation confined to a face can be more informative than a single unusual texture, although LED lighting, rolling shutter, and unstable exposure can create benign flicker.
Audio should remain a separate evidence stream. Compare phoneme timing with mouth movement, inspect abrupt audio edits, and check whether the audio track's timing remains coherent after the video's encoding history is considered. Audio mismatch can eliminate a crude splice, but clean synchronization doesn't prove that the visual track is authentic.
A spatial hit earns a temporal neighborhood, not an immediate accusation.
The time consistency problem is central to any video-level conclusion. Aggregate frame scores with a calibrated mean, majority rule, or reliable statistic, and report both the frame-level findings and the clip-level result. Also record the number and time ranges of suspicious frames, because an isolated anomaly has a different evidentiary meaning from a persistent interval.
Metrics, Stress Tests, and Generalization Risk
A detector's headline accuracy rarely answers the operational question. Frame-level ROC-AUC measures how well scores rank examples across thresholds. Video-level precision shows how many flagged clips are genuinely suspicious in the tested set. Recall measures how many suspicious clips the workflow catches, while F1 balances precision and recall at a stated operating threshold. Report these measures separately for frame scores and aggregated clip decisions.
Threshold choice follows the cost of error. A newsroom may accept more false positives to catch additional candidates for review. A legal workflow needs a documented threshold, its false-positive profile, and independent corroboration. The report should distinguish a detected anomaly from proven manipulation.
Stress tests should reproduce transformations applied to submitted files:
- Recompression: Re-encode with common H.264 and H.265 settings. Check whether scores remain directionally stable.
- Resizing: Downscale and restore the clip. Separate interpolation artifacts from evidence tied to the face or background.
- Low light: Apply realistic noise and exposure changes. Check whether sensor noise is mistaken for synthetic texture.
- Occlusion: Cover portions of the face with hands, hair, objects, or shadow. Record how much valid facial area remains.
- Platform-style export: Test chained re-encodes and audio transformations associated with messaging and social platforms.
- Out-of-distribution footage: Hold out identities, generator families, capture devices, and codecs excluded from model development.
Use the following as an Example recording sheet, not as a results table. For each condition, record AUC before and after the transformation, using the same sampled clips, frame aggregation rule, and thresholding procedure. A practical first pass includes an H.264 CRF 28 re-encode, followed by the other transformations that match the file's likely distribution.
| Stress condition | Clean AUC | Post-transform AUC | Notes |
|---|---|---|---|
| Recompression | Enter measured value | Enter value after H.264 or H.265 re-encode | Record codec, preset, and direction of score change |
| Resizing | Enter measured value | Enter value after downscale and restore | Check interpolation and lost texture |
| Low light | Enter measured value | Enter value after noise and exposure changes | Separate sensor noise from synthetic texture |
| Partial occlusion | Enter measured value | Enter value with valid face regions only | Record the occlusion type and remaining face area |
| Out-of-distribution footage | Enter measured value | Enter value on held-out sources | Name the identities, generator families, devices, and codecs |
Set aside at least two generator families and one capture device never seen during training. Report the AUC drop beside the benchmark figure, then repeat the comparison across codecs and capture conditions. A high benchmark score with a large holdout decline indicates generalization risk, not reliable field performance. Do not publish a confidence score without naming the test conditions behind it.
AI Video Detector analyzes uploaded video through frame-level analysis, audio forensics, temporal consistency, and metadata inspection. Treat its output as one input to a documented review, alongside source preservation and corroboration.
Turning Frame Scores into a Defensible Verdict
A representative newsroom case begins with a clip that produces high spatial anomaly scores around a speaker's cheek and mouth in several sampled frames. That result is useful because it narrows the inspection window. It isn't enough to identify the speaker, accuse the uploader, or publish a claim about synthetic media.
The analyst extends the sample around each flagged interval and compares facial landmarks and optical flow. If the suspected seam persists as the head turns, the temporal evidence strengthens. If it disappears when the face moves naturally, the initial score may reflect compression, lighting, or alignment error.
The escalation path should be explicit:
- Localize the hit: Record frame identifiers, timestamps, crop coordinates, and artifact descriptions.
- Extend the neighborhood: Inspect adjacent frames before and after the hit, not just the highest-scoring still.
- Check independent streams: Compare audio timing, metadata, motion, and background behavior.
- Test derivatives: Recompress or resize controlled copies and document score changes.
- Preserve provenance: Hash the original and retain every derivative used for analysis.
- Classify uncertainty: Choose a conclusion that matches the evidence, such as authentic-looking, suspicious, or inconclusive.
An isolated high spatial score should usually be downgraded when neighboring frames show clean motion, stable geometry, and no corroborating audio or metadata issue. Conversely, moderate evidence across spatial, temporal, and provenance layers deserves escalation even if no single detector produces a dramatic probability.
Report the observation before the interpretation. “A persistent luminance seam follows the face boundary across the reviewed interval” is defensible. “The person is a deepfake” may exceed the evidence.
Legal and editorial reports should state the source file, derivatives, software versions, sampling method, thresholds, known limitations, and unresolved alternatives. The conclusion should describe what the analysis supports and what it can't establish. That distinction protects the integrity of the review and gives a later examiner enough information to reproduce or challenge it.
A Reusable Frame Review Checklist
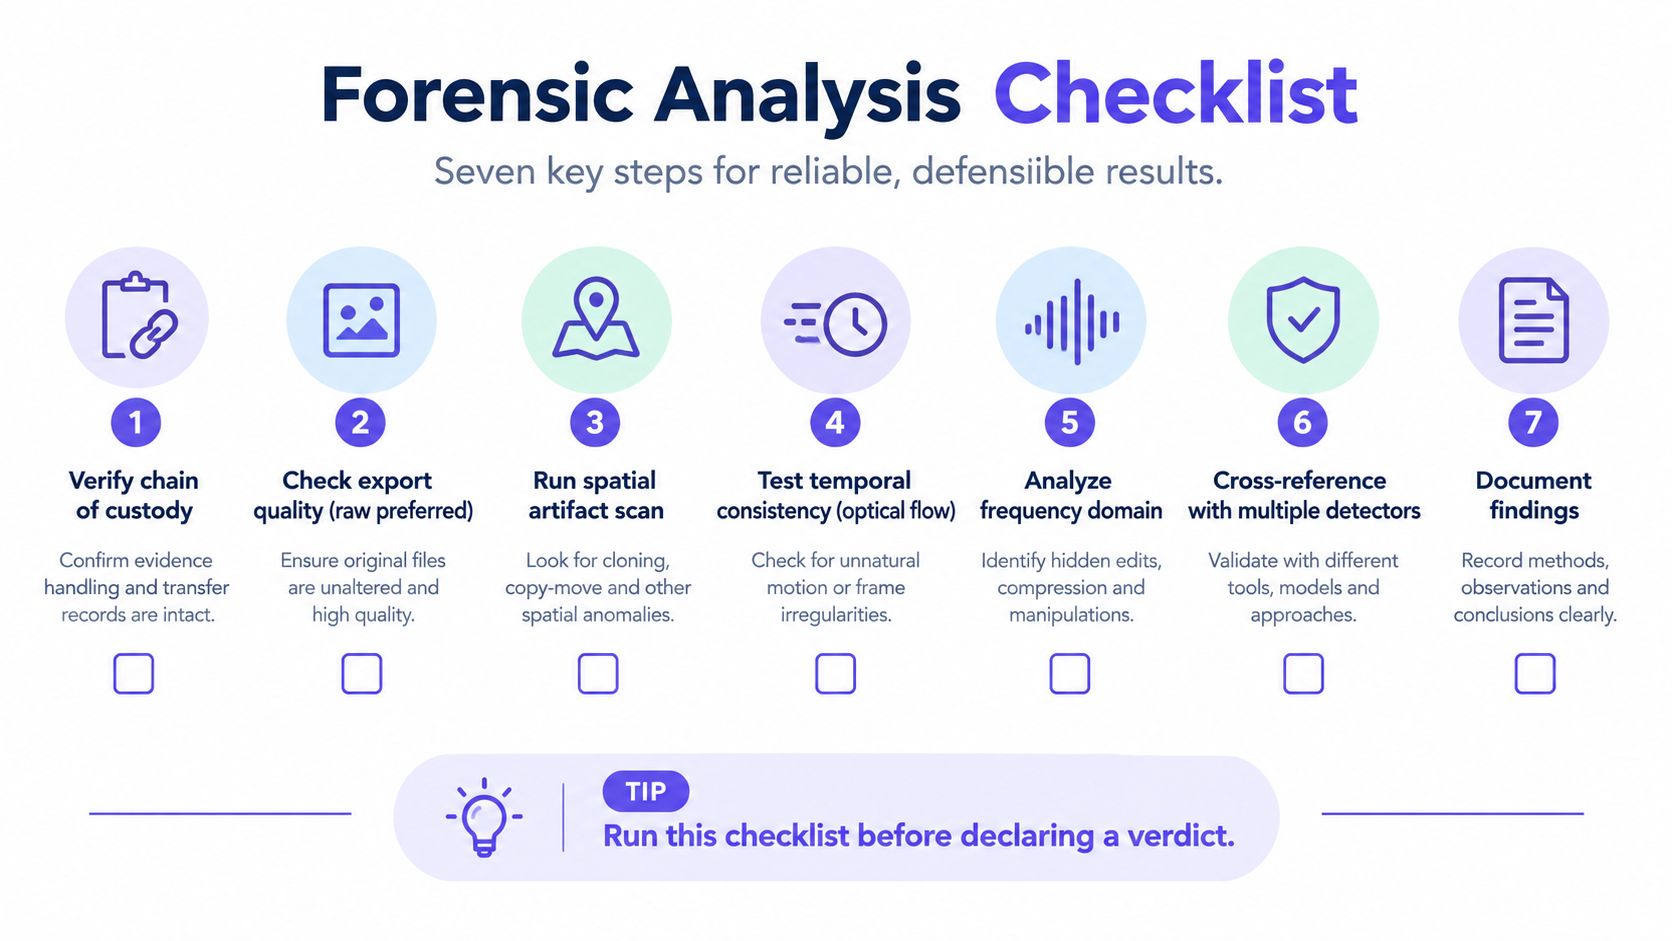
Use the following decision points on every new submission. Each one has a pass condition and a failure mode that should appear in the case notes.
- Intake and custody: Hash the original, restrict edits, and preserve the received file. Pass when every derivative can be traced back to the master. Failure occurs when an analyst overwrites the source or cannot explain how a still was created.
- Technical capture: Record container, codec, color space, bitrate, frame rate, duration, timestamps, and keyframe structure. Pass when the decoded stream agrees with the recorded file properties. Failure occurs when metadata is copied without checking the actual stream.
- Sampling design: Use uniform coverage, then add dense samples around cuts, faces, rapid movement, and suspected intervals. Pass when the plan represents both ordinary and high-risk content. Failure occurs when the analyst chooses only attractive or suspicious stills.
- Spatial scoring: Inspect blending boundaries, face texture, eye and mouth geometry, background continuity, and frequency behavior. Pass when a signal is localized, documented, and reproducible on an appropriate crop. Failure occurs when a heatmap is treated as evidence by itself.
- Temporal review: Compare optical flow, landmark trajectories, flicker, and audio-video timing. Pass when the suspected behavior persists across neighboring frames or receives independent corroboration. Failure occurs when a frame-level score is promoted to a video-level conclusion.
- Stress testing: Re-evaluate the workflow after relevant recompression, resizing, low-light, occlusion, and re-encode transformations. Pass when analysts understand score stability and failure boundaries. Failure occurs when clean benchmark results stand in for testing on the submitted footage.
- Corroboration and classification: Compare technical findings with metadata, audio, source context, and chain-of-custody records. Pass when the final category reflects the combined evidence and uncertainty. Failure occurs when the report uses conclusive language for an unresolved anomaly.

The most common operational mistakes are predictable: relying on one detector, skipping derivative testing, ignoring codec history, confusing model heatmaps with proof, and publishing before metadata and audio review. A strong process makes those mistakes difficult by requiring each layer to produce a recorded observation.
If a signal doesn't survive recompression and temporal filtering, don't report it as a finding.
If you're reviewing a suspected deepfake now, preserve the original file first, record its technical properties, and build a sampling plan before running any detector. Then document spatial hits, test their temporal neighborhoods, corroborate them with audio and metadata, and publish only the conclusion your evidence can support.